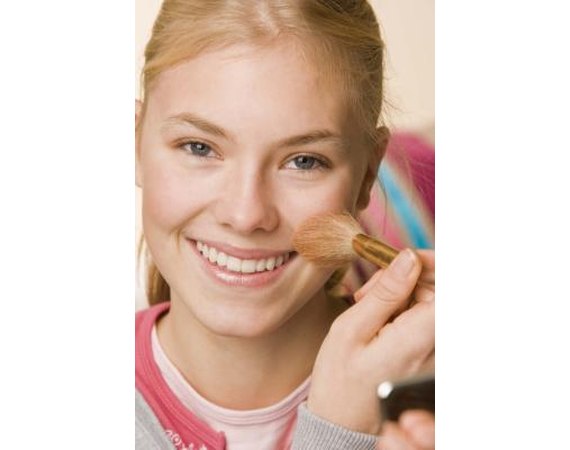
Make blue eyes look blue by wearing blue clothing, orange or brown eye shadow and blue eyeliner. Highlight blue eyes by using brown or rust colored makeup around the eyes with instructions from a freelance makeup artist in this free video on beauty and cosmetics.
Saturday, 15 December 2012
Video How to Makeup for Blue Eyes Look Bluer
Make blue eyes look blue by wearing blue clothing, orange or brown eye shadow and blue eyeliner. Highlight blue eyes by using brown or rust colored makeup around the eyes with instructions from a freelance makeup artist in this free video on beauty and cosmetics.
How to Makeup Tips for Blue Eyes and Dark Hair
Using certain colors and types of makeup can really make your blue eyes shine. If you have dark hair, your eyes are already accentuated, but the right makeup can add shine to your natural beauty. Don't use a heavy hand when applying makeup; less is generally more when all you are doing is playing up your natural assets.
 Eyes:
Eyes:
For blue eyes, the rule of thumb is to use shadow colors opposite blue on the color wheel. These include browns, golds and oranges. Warm tones such as rose and lavender work, too. You can use blue shadow, but only if the tone is darker or lighter than your natural eye color. You don't want to dull your blue eyes by matching them to your shadow. Use brown liner and either brown or black mascara to complete the look.
Cheers:
One makeup rule is to either do a strong lip color with natural eyes, or softer lips with bolder eyes. Placing emphasis on one feature at a time won't overwhelm your features. If you want to play up your eyes with heavy lashes or liner, stick to a natural pink or neutral toned gloss for your lips. Blue-eyed women look fabulous with red lipstick, but be careful to tone down your eyes with brown shadow or simply brown liner and mascara for a nice contrast.
Lips:
One makeup rule is to either do a strong lip color with natural eyes, or softer lips with bolder eyes. Placing emphasis on one feature at a time won't overwhelm your features. If you want to play up your eyes with heavy lashes or liner, stick to a natural pink or neutral toned gloss for your lips. Blue-eyed women look fabulous with red lipstick, but be careful to tone down your eyes with brown shadow or simply brown liner and mascara for a nice contrast.
How To Makeup Tips for Dark Hair & Fair Skin
Learning how to apply makeup when you are dark-haired and fair-skinned
is a lot easier than you might think. A natural creamy complexion
contrasted by raven hair allows you to play with your cosmetics to
create different looks for different occasions. Playing up your eyes,
cheekbones or lips, will give you the opportunity to change your look
for any style you feel like showcasing that day.

Eyes
 The best eye makeup tips for dark hair and fair skin have to do with hue choices and depend on the color of your peepers. Try contrasting brown eyes with green, blue eyes with brown and green eyes with blue for drama. Another trick is to match whatever "specks" of other hues can be seen in your eyes. For example, golden shadow will showcase brown eyes with a hint of gold. The rule of thumb is the darker the shadow and lining, the more sultry your eyes will look. Use an eyeliner along your lids first, then apply eyeshadow along the same line, blending it slightly upwards. For a more wide-eyed innocent appearance, cover your whole top lid with a lighter brighter shadow and thinly line just above your lashes. Finish up with a couple coats of mascara for both looks.
Cheeks

The best makeup tips for dark hair and fair skin to emphasize your cheekbones is to choose a hue that is closest to your complexion tone and sweep it just on the apple of your cheeks. Stick with a more neutral hue and avoid rosier colors if you have a reddish undertone. A rosier blush will help minimize yellowish colors, especially if your skin is more yellowish in tint. A small sweep of blush up to the hairline of a lighter bronzed or even white hue just underneath your bone will create a shadow making the apples of your cheekbones appear more prominent.
Lips

For lips, the best makeup tips for dark hair and fair skin consists of contrasting what you do to your eyes. Think 1940s movie stars for a sultry look and use a plumper to line your lips just a little above the natural line. Fill it in with a smoky deep burgundy or red to play off of your creamy white skin. For a more natural "girls next door" look, line your lips in a hue closer to your natural color and finish it off with a tinted gloss.
Skin Care
 Protecting your complexion is the most important step for dark hair and fair skinned beauties. All the cosmetics in the world cannot completely cover or repair damage from the sun and other elements. A daily sunscreen is important as your combination tends to burn easier than others. You are blessed with a naturally creamy, exotic appearance so either embrace your paleness or use a self-tanning lotion if you desire a tanned appearance. This is in addition to your regular skin care routine. Learning how to take care of your beauty assets is just as important as learning how to apply makeup how to apply makeup when you are dark haired and fair skinned.
Eyes
Cheeks
The best makeup tips for dark hair and fair skin to emphasize your cheekbones is to choose a hue that is closest to your complexion tone and sweep it just on the apple of your cheeks. Stick with a more neutral hue and avoid rosier colors if you have a reddish undertone. A rosier blush will help minimize yellowish colors, especially if your skin is more yellowish in tint. A small sweep of blush up to the hairline of a lighter bronzed or even white hue just underneath your bone will create a shadow making the apples of your cheekbones appear more prominent.
Lips
For lips, the best makeup tips for dark hair and fair skin consists of contrasting what you do to your eyes. Think 1940s movie stars for a sultry look and use a plumper to line your lips just a little above the natural line. Fill it in with a smoky deep burgundy or red to play off of your creamy white skin. For a more natural "girls next door" look, line your lips in a hue closer to your natural color and finish it off with a tinted gloss.
Skin Care
Saturday, 24 November 2012
How to Hide Hyperpigmentation With Eye Makeup
Hyperpigmentation, which is a skin condition that causes an increase in melanin and the darkening of skin and nails, can be an emotionally devastating experience. The use of hypoallergenic makeup can be used to hide the discoloration caused by hyperpigmentation and restore your self-esteem in the process.

Instructions
Tips & Warnings

Instructions
- Use makeup that is hypoallergenic and fragrance-free when attempting to hide symptoms of hyperpigmentation. Some medications such as retinol and hydroquinone can increase skin irritations and rashes, and the use of regular cosmetics can aggravate your skin even further. Your dermatologist can recommend a number of makeup brands that will be both gentle on your skin and compatible with your skin therapy.
- Start with a concealing type of makeup, such as a foundation or a cream, to hide your hyperpigmentation. The concealer should be thick enough to hide inflammation or skin irritation, yet smooth enough to blend in with your skin type and color. You may have to experiment with several different shades to find the one that matches your skin color and looks natural.
- Hide the discoloration caused by hyperpigmentation with makeup that functions as a color corrector. For instance, a purple tint will offset a yellowish discoloration, while a green tint will neutralize red or brown patches. Work the color correcting makeup into the concealer to hide your hyperpigmentation effectively.
- Try contouring makeup to camouflage swelling, discolorations or raised areas of hyperpigmentation. Darker shading will lessen the appearance of bumps or protrusions, while lighter shades will conceal pits or depressions.
- Wash all makeup from your neck and face every night with a mild soap cleanser and water before you go to bed. Use a moisturizing cleanser on affected areas after the makeup is removed, since most hyperpigmentation treatments can dry out your skin and cause rashes and irritation.
- Find online resources, such as the website for Debbi Stewart, to buy hypoallergenic and fragrance-free cosmetics to hide your hyperpigmentation. The Debbi Stewart site offers mineral-based makeup that is easy on your skin.
Tips & Warnings
- Makeup that is used to hide hyperpigmentation on your arms and legs can be left on for three to four days without any additional skin irritation or side effects.
How to Create Your Signature Makeup Look
Your makeup should be all about you. There's no need to blend in with the rest of the crowd and follow trends if you don't feel like it. In fact, makeup can be used to express your personality without you having to utter a word.
Instructions:
Instructions:
- Examine your facial features: Which ones are you most proud of? Which features do you want to bring to the spotlight? Play up and emphasize these features. Maybe you have fabulous skin and want to show it off with foundation and blush that make you appear as though you are glowing from within. Perhaps you have high cheekbones. Learn how to highlight and accentuate them.
- Notice which colors look particularly flattering on you and which shades make your complexion come alive, your eye color brighter and your hair color more vivid. Perhaps you have a favorite color that you can customize to suit you better. For instance, you may love blue but may not look striking in baby blue yet appear stunning in navy. You can use this color as an eyeliner on a regular basis.
- See if there are any marks on your face that you can use to stand out or distinguish yourself from the masses. You can enhance an existing beauty mark or even allow freckles to show if you've been hiding them all of this time.
- Keep it simple if yours is a no-fuss personality. One option is to pick a favorite shade of lipstick that becomes you and wear it until it no longer resonates with you. Many women shy away from red lipstick but, if you have the personality and the facial features to carry it off, why not give it a try?
- Figure out which makeup textures work best for you. Is matte more suited to your skin type? Perhaps you'd look good and would benefit from using cosmetics with subtle shimmer and fine light-reflective particles.
- Do a little research on celebrities and other famous personalities to find those you share facial features. You are exploring not so much to copy, but to get ideas you can turn into original creations. If you find makeup styles you like, adjust them to your own taste.
- Study the makeup styles that were popular over the years. Take inspiration from a shade of eyeshadow popular in the 1950s or the lipstick colors that were such a hit in the sixties, as an example. Your makeup style may have been in vogue long before you were born. The key to making a look yours is to adapt it to your personal preferences--tone down the shade a little bit or amplify it, perhaps. The choice is yours.
- Find which of the steps listed here you can combine to accomplish what you're looking for.
- Make an impression that is uniquely you by discovering your personal preference of hair and clothing styles to wear with your signature makeup look.
- The colors and styles that most flatter you, in case you still find yourself clueless, are what others compliment you on consistently and those that make you feel good every time you wear them.
- You will know it when you find your personal signature makeup look because you'll love it. This may take a while, especially if you are still in the process of experimenting. In the meantime, have fun and be patient.
Saturday, 17 November 2012
How to Makeup a Cyclops Costume
Greek mythology's tales of heroes, sirens and terrifying monsters were the original campfire stories. One of its most popular and iconic characters is the giant, one-eyed cyclops, one of three (or more, depending on the storyteller) giants who had single, large eyes in the middle of their foreheads. The cyclops has appeared in works by Homer, Virgil and Euripedes, among other classical Greek authors. For a mythology or monster-themed party, a cyclops is an interesting and unique costume that is also easy to make. Does this Spark an idea?

Instructions:
Tips & Warnings
Instructions:
- Use the butter knife to pry off the lens of the tap light. Discard or set aside the rest.
- Cut the tap light lens into the oval shape of an eye, wide enough to cover both lenses of your sunglasses from corner to corner.
- Place the tap light lens against the lenses of the sunglasses. Mark the lens with a pencil where the wearer's eyes will be.
- Cut two small slits in the tap light lens, where the wearer's eyes will be. Make sure the slits are wide enough to see through.
- Tape or glue the tap light lens to the sunglasses.
- Paint a large pupil and iris in the color of your choice onto the tap light lens. If desired, cover up the slits with bloodshot eyes, taking care not to get paint on the lenses of the sunglasses.
- If desired, cut eyelashes out of the construction paper and glue them to the top and bottom of the tap light lens.
Tips & Warnings
- This costume can be worn with anything. For a more classical look, wear it with a toga or loincloth. For a more modern cyclops, such as the one on the television show "Futurama," wear the mask with a dress, a suit or army togs.
- Do not wear this costume while driving, or doing anything else where vision impairment may pose a danger to yourself or others.
How to Turn a Catholic School Girl Uniform Into a Costume
Turning
a Catholic school girl uniform into a costume is a quick, efficient and
affordable idea. Catholic schools all have different uniforms. Some are
single-piece jumpers and others are white button-down shirt and plaid
skirt combinations. The shirt/skirt combination is the most efficient
one to use for a costume. Normally, the school girl costume is percieved
as sexy; therefore, it is best for adults.

Instructions
- Cut your skirt hem shorter based on your preference. Most Catholic schools limit uniform hems to below the knee. Hem the skirt with a sewing machine to keep it from fraying.
- Take the bottom front of the button down shirt and tie the two sides into a knot. How high you tie the knot depends on your preference. You can secure the knot with a safety pin to ensure that it stays intact. You also can modify the shirt by cutting the sleeves shorter or off.
- If the uniform comes with a neck tie, add it around your neck or tie it around your waist. Complete the sexy girl look by adding knee-high stockings with heels or knee-high boots. Other details include wearing nonprescription glasses and styling your hair in pigtails.
Friday, 16 November 2012
Adriana Lima Without Makeup | Adriana Lima No Makeup
Victoria’s Secret model,
Brazilian-born Adriana Lima, is a mind-blowingly hateful freak who can
give birth and then flounce around nearly naked on network television
without a care in the world just a few weeks later. No one on earth
likes her.
 The heart-breakingly gorgeous, 31-year old model,
wife, and mother of two recently placed eighth on Forbes Magazine’s
World’s Most Powerful Latino Celebrities list, by shaking her
money-maker on the runway to the tune of $7 million in one year, between
May 2011 and May 2012 (keep in mind that she was pregnant for a large
part of that time).
The heart-breakingly gorgeous, 31-year old model,
wife, and mother of two recently placed eighth on Forbes Magazine’s
World’s Most Powerful Latino Celebrities list, by shaking her
money-maker on the runway to the tune of $7 million in one year, between
May 2011 and May 2012 (keep in mind that she was pregnant for a large
part of that time).
That’s why it’s pleasant to those of us who have evil hearts, to see that Adriana Lima without makeup looks pretty, but not outrageously so.
 At first glance, this photo of the model with a clean face, is not particularly earth-shattering. The longer you stare at her though, those crazy blue eyes begin to hypnotize
you. They are subliminally reminding you: “Yes, my face is beautiful,
but wait until you see my gigantic rack.” Her skin is a bit shiny
without any makeup, but her complexion is gorgeous. Her eyes are
striking and those big old lips are ridiculous.
At first glance, this photo of the model with a clean face, is not particularly earth-shattering. The longer you stare at her though, those crazy blue eyes begin to hypnotize
you. They are subliminally reminding you: “Yes, my face is beautiful,
but wait until you see my gigantic rack.” Her skin is a bit shiny
without any makeup, but her complexion is gorgeous. Her eyes are
striking and those big old lips are ridiculous.
The next photo was tweeted by Adriana herself on October 8th of 2012. It shows her after just completing a workout, which she must be doing non-stop these days to prepare for the 2012 Victoria’s Secret Fashion Show in two months. Her face looks lovely in this photo, but again, face shmace, she’s known for her bod. Her face is great but it’s not the star attraction.
That’s why it’s pleasant to those of us who have evil hearts, to see that Adriana Lima without makeup looks pretty, but not outrageously so.
The next photo was tweeted by Adriana herself on October 8th of 2012. It shows her after just completing a workout, which she must be doing non-stop these days to prepare for the 2012 Victoria’s Secret Fashion Show in two months. Her face looks lovely in this photo, but again, face shmace, she’s known for her bod. Her face is great but it’s not the star attraction.
Adele Without Makeup | Adele No Makeup
Adele has made many strides in music – all the while giving a two-fingered salute to conventional standards
and to Karl Lagerfeld, who, incidentally, emerged from his mother’s
womb wearing sunglasses. Sometimes Adele abstains from using those same
two fingers to dab on a little foundation.
 In a look
reminiscent of elderly, winter-ready babushkas often found dotted around
Russia, the first photo sees Adele without makeup and looking even
paler than usual. Looking at her right hand here, she may be looking for
her own pulse actually.
In a look
reminiscent of elderly, winter-ready babushkas often found dotted around
Russia, the first photo sees Adele without makeup and looking even
paler than usual. Looking at her right hand here, she may be looking for
her own pulse actually.

 The blemish-free ‘Chasing Pavements’ songstress appears to be in the middle of a phone call, and my guess is that she isn’t chatting to Karl Lagerfeld to get style and makeup tips.
Photo number two captures a visibly tired-looking (looks like an early morning) Adele foregoing makeup yet again, and loitering near the check-in desks at an airport. What a cool girl – looking down-to-earth while about to take flight.
Photo number two captures a visibly tired-looking (looks like an early morning) Adele foregoing makeup yet again, and loitering near the check-in desks at an airport. What a cool girl – looking down-to-earth while about to take flight.
Adam Lambert Without Makeup | Adam Lambert No Makeup

Adam Lambert definitely has a look … the heavy makeup, the hair, the flamboyant clothes. The 30-year old singer/songwriter is as famous for his style as his music. He pulls it off well, but enough already, Glambert.

We get it … you’re gay and you’re fabulous and it’s all good. Just go a little easier on the eyeliner … people will think you’re a slut. Seriously, though, Adam Lambert without makeup looks amazing.
That is a handsome guy. He looks like soap opera actor. Adam Lambert has ridiculously pretty eyes. And those lips! Without the foundation, you can see that his adorable freckles and even some stubble. If I wasn’t a woman, I would be all over that.

Monday, 5 November 2012
How to get discount mac makeup
Mac is a cosmetics company that offers fine makeup products. It is one
of the most popular and high quality cosmetic brands on the market. In
addition to being one of the most popular brands, it is also one of the
most expensive. Fortunately, there are ways to find Mac makeup at
discount prices or to save money on your next purchase.
Instructions
Finding Discount Mac Makeup
1. Join Mac Pro to receive valuable discounts on a wide range of cosmetics. Members of the program receive 30 percent off their Mac orders (makeup artists get 40 percent off). There is an annual membership fee of $35; however, this fee will pay for itself in savings. To register, download a registration form from maccosmetics.com and mail it -- along with a copy of your identification -- to:
Mac Pro Membership
PO Box 435
3219 Yonge Street
Toronto, Ontario
M4N 3S1
You will receive a membership card with two weeks.
2. Use discount cosmetic websites. Online makeup discounters offer high-end designer cosmetics at discounts ranging from 10 to 20 percent or more. Visit makeup-discounters.com and maccosmetics-discount.com. Shop around and compare websites to see which of the many online discounters offer the best prices on Mac products.
3. Purchase Mac products through auction websites, such as ebay.com or auction.overstock.com. Auction websites provide listings from resellers and wholesalers selling many designer cosmetics at reduced prices. These websites also give you the option of purchasing used items, which will save you even more money.
4. Visit high-end outlet stores, which offer a variety of discounted items such as designer clothing, accessories and cosmetics. An example of a few stores that offer these discount products include Nordstrom Rack and Sacs 5th Avenue Off 5th. These stores receive quality clearance products and overstock inventory from high end department stores, then pass the savings on to you.
5. Take advantage of online discounts. Select online Mac retailers run discount offers such as free shipping on orders over a certain amount. You can also save with coupon codes for Mac products through popular coupon websites such as retailmenot.com and dealspl.us. Online coupon providers update their coupons often, so be sure to check back with them periodically for new discount offers.
6. Consider registering your email address on Mac's main website. This can be done by accessing maccosmetics.com, clicking on the "Email Me" tab and filling in the required information. Upon completion you will periodically receive product news as well as special insider-only offers via email.
How to Create a Warm Neutral Makeup Look for Fall
The fall season calls for more subdued colors and less vibrant
make-up.This look features bronze coloring with brown undertones. You
can wear this eye during the day or evening with your hair styled up or
down. The eye has black mascara and liner to counter and complement the
brown shades on the eyelid. Any skin or eye color can wear the bronze
brown eye look. Any color of clothing can be worn with this make-up, but
neutral colors or black flatter this look best.
Instructions
Pat eye primer onto your eyelid with your fingers. Eye primer prevents eye make-up from creasing or fading on the eye during wear.
Use your finger to pat bronze cream eye shadow onto the eyelid with your fingers. Use a gentle motion that isn't too firm.
Apply metallic brown eye shadow onto the eyelid over the bronze cream shadow. Do this with a shadow brush for a smooth application.
Apply a metallic tan eye shadow to the inner 2/3 of the eyelid with a blending brush and blend the color into the crease. To blend, simply sweep the brush upward and outward along the crease of your eye toward your browbone.
Use a liner brush to apply the brown cream eye shadow to your lower lash line.
Apply black eye liner to the upper lash line.
Apply black mascara to the upper lashes only.
Pat bronzer onto your bare face with a bronzer brush to warm up your skin tone. Don't bother with foundation as this look highlights a natural face best.
Apply a petal pink blush with your bronzer brush. Apply blush just on the apples of the cheeks and use a light dusting of it to prevent a too obvious showing of color.
Finish this look with a nude lipstick.
How to Black Eyeliner Makeup Tips
Few makeup products are as versatile as black eyeliner. Depending on how
you apply this cosmetic bag staple, you can create cool rock-chick
looks, old Hollywood cat eyes, or just a subtle work or weekend style.
Black eyeliner adds definition and brightness to the eyes, or it can
create a smoky gaze when smudged and layered with shadow. Start
experimenting with different types of liners and methods of application
for your most gorgeous glance yet.

Choosing the Right Liner
Black pencil eyeliners provide the most precision and are easy to control--when you use a pencil eyeliner you're essentially "drawing" the way you would on paper, and most of us are familiar with that motion. Pencil eyeliners are good for well-defined lines and basic eyeliner looks.
Black cream eyeliners were once nearly exclusively in the domain of professional makeup artists, but today several drugstore brands offer cream or gel liner formulations. With their richer texture, cream formulas can be "painted" on and actually used to cover the entire lid in the place of shadow. Because they blend and smudge well, black cream liners are ideal for smoky eyes or messy rock-chick looks. If you don't want any smudging or are less experienced with eyeliner, creams may not be your best choice.
Liquid liners are often used to create the retro "cat eye" look. The angled pen used to apply most liquid liners is great for flicking the line out the end and varying the width of the line over lid. Liquid eye liner has a wetter, shinier look to it even after it's dried.
Eyeliner Styles.
Black eyeliner adds definition and brightness to the eyes.
For a natural look, lift up your eyelid and hold the skin taut. Then trace a very fine black line along the inner lid, below your lashes. This will make your eyes pop and your lashes look fuller without it seeming like you're wearing any make-up.
For a dramatic look, smudge black eyeliner on with your fingers or a cotton swab.
If your eyes are on the small side, avoid lining both top and bottom lids in black--this can make the eyes look smaller. Line just the bottom lash lines. If you do line the top lashes, use a lighter color, like gray, on top with black on the bottom.
Applying Liner
If your hand tends to get unsteady while you apply liner, rest your elbow on a table.
Try applying black eyeshadow over the top of black liner. Dip a small, angled shadow brush into matte black shadow and carefully trace over top of the liner. This will help the line last throughout the day and make it look more intense.
If you're using a pencil, make sure it's sharp before you apply the liner. If you're using a cream liner, wipe the applicator brush clean before dipping it back into the pot to prevent any dry clumps of liner or stiff bristles from messing up your look.
Saturday, 3 November 2012
How to: Makeup & Hair for the New Year
New Year's Eve is an opportunity to attend the best parties of the year,
but even more importantly, it's a time to look back on the previous
year and make some changes for the new year ahead. How you approach your
hair and makeup for New Year's Eve should correspond to your mental
outlook for the new year by an equally new representation of your
physical self in hair, makeup and clothing. Set aside enough time to
transform yourself completely, and step out of your house looking like a
new you. Does this Spark an idea?
how to do nail art designs for beginners at home
How to do nail art - Try a bright base nail color, followed by an edging strip across the tip. Stickers galore are on the market today. Whatever the season there will be something available to suit. So let loose and let your imagination run free
Bold colors are here to stay, so why not create your own designs and make each nail unique to you?Try a bright base nail color, followed by an edging strip across the tip. Stickers galore are on the market today. Whatever the season there will be something available to suit. So let loose and let your imagination run free.
What you will need:
1. Cotton pads – lint free is best
2. Nail polish remover (acetone free if you wear fake nails otherwise they will dissolve)
3. A selection of colors, e.g. electric, glitter, light and dark shades
4. Clear base coat
5. Quick drying top coat
6. Stickers and rhinestones
7. Tweezers
8. Kitchen towel
9. Q-tips
10. Thick hand towel
11. Table or large tray
Preparation:
1. You will need at least 1 ¼ hours free to avoid rushing your nail art.
2. Unscrew all nail polish bottles and acetone ready for ease of use.
3. Roll towel up to rest your hands on while painting.
4. Sit at a table if possible, if not then use a large tray on your lap so that everything is to hand.
5. Have a basic idea of what designs you are going to create. Why not go really wild and have a different design on each nail? Remember not to have too many similar colors together. For dramatic effect you would want a blue, a red, a green, a yellow, etc.
6. Where possible have at least one electric color on each hand. It is eye catching and will draw attention.
Method:
1. Apply the clear base coat and allow 5 minutes for drying. This is important because bright nail polishes will stain your nails.
2. Lightly apply the main color to your nails.
3. After 1 minute run your finger tips under the cold water faucet to assist with drying.
4. Wait 15 minutes and apply the quick dry top coat.
5. After an additional 30 – 45 minutes you can begin your design. It really is important to ensure the bottom coat is completely dry before building onto it.
6. Here are some thoughts for each individual nail:
- Electric yellow base coat with a diagonal stripe of electric green across the edge. Do not panic about smudging or over-painting when you do edging, this can be dealt with later.
- Using tweezers, place 3 rhinestones on the top corner in a curve to give a cute gem stone effect.
- A pretty flower sticker sitting at the base of the nail next to the cuticle.
- A baby pink base coat with a fuchsia glitter coat on top.
7. Wait another 5 minutes and run your nails under a cold water faucet again. Shake dry if possible.
8. Approximately 10 minutes later apply a final base coat.
9. Wait until all nails are 100% dry, and then where necessary, dip a Q-tip into the nail polish remover and gently rub around the edges to clean off any over-painting.
10. Your nails are now gorgeous and eye-catching. As you become more experienced you will be able to create some patterns which will be totally unique to you.
A bright orange base color with a black tip.
Sunday, 12 August 2012
How to apply eye makeup
How to apply eye makeup - Eye makeup can define how natural or dramatic your look is. Whether you want to learn a process you can use every day or look stunning for a special occasion, here's how to get it right.

STEP 1:
With a brown eyeliner pencil (more natural-looking than black), draw a line as close as possible to your upper lashes. Then apply a matte, earth-toned brown shadow along the crease of your eyelid. Brush a paler matte brown shadow on your lid.The Expert Says:
Emphasizing the crease in your lid makes your eyes appear larger.
 |
STEP 2:
Curl your eyelashes and apply mascara.The Expert Says:
If your lashes are short, use a thickening mascara, not a lengthening one, which will weigh them down.
 |
STEP 3:
To make your eyes seem larger, draw a thin line along your inner lower eyelid with a brightening pencil.A white pencil works with pale skin; for darker complexions choose a golden-beige pencil.
 |
STEP 4:
Dot a tiny bit of cream blush just under your browbone. Blend with your pinkie down toward the crease of your eyelid.The Expert Says:
Adding a hint of blush to your lids complements the blush on your cheekbones, warming up your whole face.
For this part of my Makeup 101 series, I cover brows, eye shadow, liner, primer, and mascara.

Brows
Most people don’t realize what a huge difference well-groomed, defined brows make in framing the face. Fill in your brows and check out the difference (or just check out the video below to get an idea). I realized the importance of brows in recent years and always make sure to fill in mine before I head out.
Tweeze stray hairs and use a pencil or powder to fill in the shape. For blondes and redheads, use a color one shade darker than your hair. For brunettes, go one shade lighter. Use short, feathery strokes for a natural look.
The easiest way to get brows into the most flattering shape is to visit a salon or spa – or a Benefit Cosmetics Brow Bar. Brow shaping will set you back about $20 to $25. It’s a good investment, because when you have it done just once, you’ve go the basic shape in place and all you really have to do is maintain it by tweezing the little hairs that pop up here and there.
Eye Shadow and Liner
For a casual look and quick application, I use one or two shadows and a pencil liner.
The basic steps:
- Dust a light shade all over the lid and up to the brow bone. This helps even out skin tone and acts a base.
- Dust a shimmery medium shade on the lid, which has a brightening effect, or sweep a matte, medium shade just in the contour/crease to add depth and definition.
- Line with a black or dark brown pencil or a dark powder shadow all the way across the top lash line only. Liner extends the lash line to make lashes look longer and eyes look bigger. My favorite pencil liners are Benefit BADgal Liner Waterproof or Urban Decay 24/7 Glide-On Eye Pencil.

When I have more time and want to create a polished look, I generally work with four shades of eye shadow and a gel liner.
The basic steps:
- Dust a light shade all over the lid and up to the brow bone as a base.
- Press a medium or deep shimmery shade on the eyelid with a brush. Pressing the powder in helps it last longer and gives the color more intensity.
- Apply a medium shade in the contour/crease area, which creates a shadow and adds definition.
- For more definition, shade with a dark shadow at the outer corners of the eyelid.
- Line eyes with a gel liner and a fine-tipped brush all the way across the top lash line. A gel liner gives a crisper line and stays on really well. My favorite is Bobbi Brown Long-Wear Gel Eyeliner. It’s pretty much the gold standard of gel liners.
- If I want a smokier, softer line, I’ll apply a dark shadow with a fine-tipped brush on top of the gel liner along the top lash line and apply a little of the dark shadow along the bottom lash line.
Blending doesn’t take very long but is very important for getting the most natural look. It also helps the makeup last longer. It’s easiest to blend with a brush that has little to no product on it so come back with your brush after you’ve laid down the color – just tap off excess product or rub the brush on a tissue. Making little circles with your brush makes it easy to get colors to blend together.
Powder Eye Shadows
I usually use powder shadows, because I find them easiest to apply and blend. My favorites are Bobbi Brown Eye Shadows (shown above) and Guerlain Eyeshadow Palettes (shown below), which include perfectly coordinated colors.

Primers and Cream Shadows
For most of us, shadows tend to fade away and crease as the day passes, due to oily eyelids and the continuous movement of the eye. Primers can really help colors last longer and prevent creasing. Benefit just came out with a great one, Stay Don’t Stray that prolongs the life of both eye makeup and concealer.
You can also skip powder shadows and opt for a long-wearing cream shadow for longer lasting color that’s resistant to creasing. I don’t use them as much, because I find powder shadows easier to work with. But I think cream shadows are great just on the lid. Benefit Creaseless Cream Eyeshadow/Liner and Bobbi Brown Long-wear Cream Shadow are both excellent.
Brushes
I have a large arsenal of brushes; but you can narrow it down to a few essentials. A fine, angled brush, like the Trish McEvoy 33 brush shown at the bottom below, is a must-have. You can use it to fill in brows and line the eyes. A medium fluff brush, like the Bobbi Brown Eye Shadow brush shown at top, can be used all over the eye and for contouring. A medium, angled fluff brush, like the Bobbi Brown Angle Eye Shadow Brush shown in the middle, is a nice-to-have that makes it easier to apply shadow in the outer corner and can also be used for contouring. If you use cream shadows, use synthetic brushes or your fingers.

Mascara
Mascara has an amazing, eye-opening effect that makes eyes look bigger. I feel so naked without it. When applying, get the brush as close to the roots as possible and wiggle it back and forth as you brush outward. To make lashes look their longest, make sure to get the lashes at the outer corners (I wrote a post specifically about this with a more detailed how to and info on why it helps).
Do not brush mascara on the top of lashes. That will weigh down the lashes and pretty much defeat the purpose of the mascara.
For lots of volume and length, my favorites are Guerlain Le 2 de Guerlain Mascara and Benefit BADgal Brown Mascara.
Friday, 10 August 2012
How to do smokey eye makeup
How to do smokey eye makeup - Smokey eyes have been a big style for quite awhile and there's no sign this particular trend is dying. Here we show you step-by-step instructions on how to get the perfect smokey eye.
Here's How:

How to get perfect smokey eyes
- Prep the lid. The key to keeping eyeshadow from melting into your
eyelid crease as the day goes on is to kept eyelids oil-free. To do this
start with an eyeshadow base (also called "primer"). Simply swipe the
primer across the eye and let it dry before you continue to the next
step.
Some great primers for a smokey eye include MAC's 'paint' and Urban Decay's 'Primer Potion'.
- Apply eyeliner. If you're going for a typical black, brown or gray
smoky eye, apply liner in one of those colors above the upper lash line,
drawing line thicker in the middle of eye. If you're opting for a
jewel-toned eye (violet makes a gorgeous smokey eye), line eyes with a
purple, blue or deep green liner.
For more intricate directions on lining for a smoky eye see How to apply eyeliner. Also see my list of the best eyeliners. I include several that work great for the smokey eye. - Blend in color on bottom lashes For color on the bottom (a key smokey eye look) you'll want to use a eyeliner pencil because they're easiest to smudge. Once the line is drawn, run your finger over it to smudge the line. You can also apply a bit of shadow to get full smudge effect.
- Apply light base color Again, the key to a smokey eye is pairing a lighter base with the darker hue. I prefer a nice cream shade for my base. Sweep a light, shimmery shadow over the lids to your browbone. I love Stila's whipped eye shadows. The moist "mousse" consistency seems to stay on forever. My favorite colors are taupe and pearl.
- Blend in darker color, but keep dark color below the crease. Now that you have the base and eyeliner on, it's time to get the smokey effect. You need a darker eyeshadow shade. Using an eyeshadow brush blend in color starting at your lash line, blending up. Make sure to blend color into the lash line so the eye liner disappears. Stop deep color at crease. The key here is to blend, blend, blend.
- Doublecheck your work Make sure eyes match and blend color with a Q-tip if need be.
- Finish with several coats of mascara. You'll want to apply a few coats of mascara so lashes are thick and dark. If you don't have naturally long, curled lashes, curl them with a lash curler first. See my list of best mascaras if you don't have one you love.
Tips:
- Remember to keep lips nude. When applying strong makeup (like smokey eyes or red lips) put the focus on either eyes or lips, never both. (Think Angelina Jolie: She either plays up her huge eyes or her huge lips, never both. If she did, she'd look like a clown).
- For a bit of fun, try a blue or purple mascara. It will make blue eyes "pop."
- Liner doesn't have to come in pencil form. Makeup experts know eyeshadows make some of the best eyeliners. To do this take an eyeliner brush (available at Sephora, MAC or any dept store), wet it, then dab wet brush into the dark shadow. This allows for a deep, precise line. You can also use the dark shadows without wetting brush first. Either way, eyeliner is necessary for smoky eye.
- This season go jewel-toned (blue is great for you blue-eyed girls) and keep your eyes smoky but stay away from dark browns and black. Instead, go for a deep purple, a gold-brown or any of the many vibrant colors in this year.
What You Need
- Eye primer (you don't need it, but it's great for keeping shadow in place)
- 2 Shadows: One light, one darker
- Eyeliner
- Makeup brushes
- Mascara
Subscribe to:
Comments (Atom)